Power Up - IFDIS
IDFIS™ Pre-Power Up
Ø Ensure that all IDFIS™ Pod/s ON/OFF toggle switches are set to ON.
Ø Ensure that the DMM switch is set to ON (notes that on some models of DMM ie the Keysight, this can only be determined after power has been applied). If the system was shutdown correctly prior to a fresh Power Up, then then DMM should have remained in the ON condition.
IDFIS™ Power Up
For most IDFIS™, the power supply is provided by the Tripp-Lite UPS System (if the system you are using does not use Tripp-Lite, then please refer to the relevant owners manual for the system installed). For IDFIS™ with Tripp-Lite, the system will come pre-configured with the Tripp-Lite UPS and Sequenced Power Strip.
IFDISRefer to the attached Owner's Manual for the...
explain that it comes pre-configured with the UPS and Sequenced Power Strip, then simply state what is shown on Page-8, "Quick-Start Guide" Step 3
Ø Turn the UPS to ON by pressing the ON/MUTE button, and hold it for several seconds until you hear a beep; then release, see UPS Front Panel for more details.
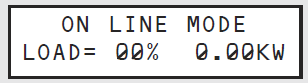
Ø After successful completion of startup diagnostics, your UPS will begin providing power to its outlets. The INPUT, AC/DC (converter), DC/AC (inverter) and OUTPUT LEDs will illuminate and the LCD screen will display:
 Should there be any issues on turning the UPS on, it is advised that you refer to the complete UPS Quick Start guide.
Ø Allow the UPS time to perform battery diagnostics, then the Sequenced Power Strip will begin to turn on IDFIS™ hardware, one at a time, in predefined sequence.
After successful completion of startup diagnostics, your UPS will begin providing power to its outlets. The INPUT, AC/DC (converter), DC/AC (inverter) and OUTPUT LEDs will illuminate. If you're having trouble turning the UPS on at this point, you may be pressing the ON button too long! Release the button while it is beeping and NOT after it stops.
Ø Wait for Windows to boot and SPIDER™ Monitor to start and then minimise.
Ø Double-click on the NODES™ Icon  takes you to the NODES™ Options menu. Follow the link to 'How To Test' to learn more about testing and the Main Testing Menu options in more detail.
Ø If NODES™ does not start or it causes an error, double-click the NODES™ Recovery icon