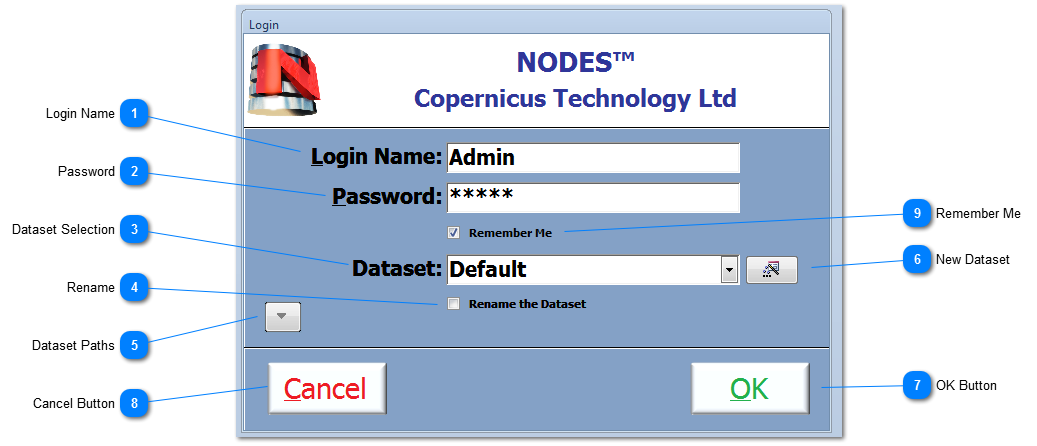
Double-click on the ic on on the Windows Desktop to start NODES™ , the User will be presented with the Login screen.
 Login Name The Login Name is allocated to each User by the Administrator under the Add/Edit Users. Login Names are not case sensitive.
Default Login and Password are both set as: Admin
|
 Password Passwords are originally allocated by the Administrator and can be changed by the User under the Administration Board. Passwords are not case sensitive.
Default Login and Password are both set as: Admin
|
 Dataset Selection NODES™ has the ability to connect to a number of datasets. The ability to have more than one datasets allows a User to separate their client or contracts on to different datasets or, for example, have a dedicated training dataset. Select the dataset you want to connect to using the dropdown.
|
 Rename Check this option to request the dialogue to enter a new name for the selected dataset; names have to be unique and have between 6 and 25 characters.
|
 Dataset Paths Click to display paths of datasets. Current and Last Known paths are established and if the Selected Path is green, then the dataset is connected. If red then the selected dataset is not yet connected. If not connected, then NODES™ will try and establish a connection; if this is unsuccessful, then another dataset will have to be selected by the User.
|
 New Dataset This function allows the User to create a new Dataset, which can then be selected from the Dataset dropdown. The User will be asked for a 'User Defined' name for the dataset, which will be shown in the dropdown and then a file name. All datasets are stored in the \NODES_CoreData\Data folder. This function is not available during Login.
|
 OK Button Click OK to Login. The Login process, automatically checks the validity of the dataset, including updating to the latest structure; it will then connect it using the Login Name and Password. If the Login is successful, the Main Switchboard will appear. |
 Cancel Button This cancels all activities within NODES™ and returns the User to the Windows Desktop.
|
 Remember Me Remember MeCheck to automatically Login next time. If the Windows User changes, then this option is cancelled. There is a small pause on start up to allow the User to un-check this option.
|
Made with help of Dr.Explain
|