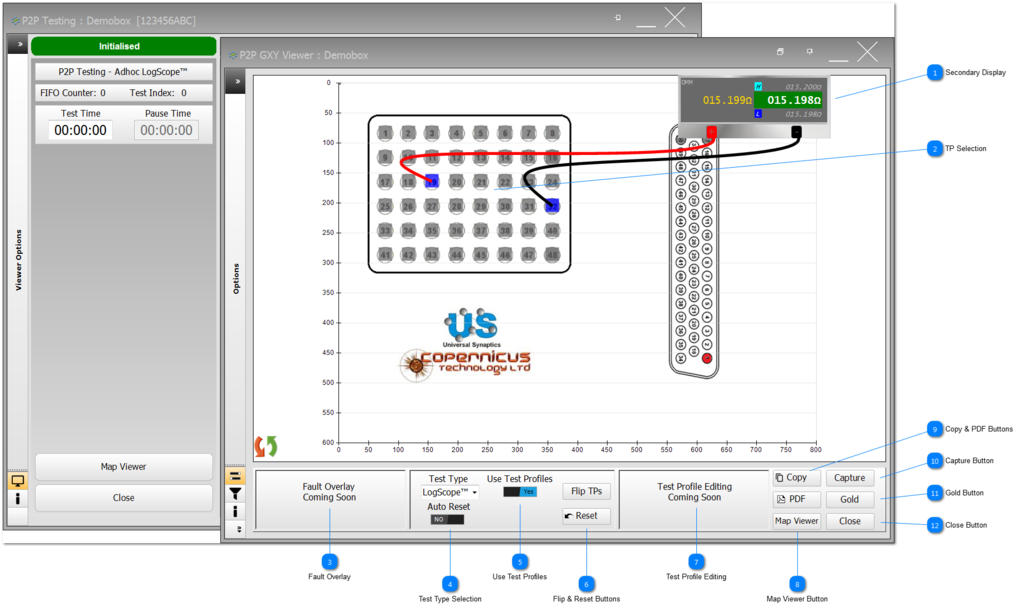
Click&Test™ is a quick and easy way to effectively perform a range of different tests on specific TPs within the UUT. The User can use predefined Test Profiles or select any TPs within the UUT's map configuration, to carry out diagnostic tests using the IFD™ TE and the dedicated ITA; this functionality provides the User with maximum flexibility and utilisation of the testing hardware. This topic describes the generic use of Click&Test™ and it also outlines the difference for each of the specific instruments that may be available to the User, depending on IFD™ TE model and configuration.
Secondary Display
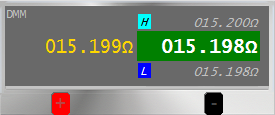
For all Click&Test™ testing a Secondary Display will be shown on the GXY which mimics the instrument's application display.
Shown here is the output from the LogScope's application display.
This secondary displays is designed to help the User see the results quickly in relationship to the TP selected on the GXY, especially so if the instrument's application is on a different part of a big screen or even on another screen entirely.
The Secondary Display will be similar to instrument's application display and it will show a green background (shown here) if the comparison to the Gold value is within tolerance, or on a red background if the reading is out of tolerance; a comparison will only take place if there is a Gold value available.
Each TP defined in the UUT configuration will be displayed on the GXY. If the TP is available to select, see more on Use Test Profiles, the TP will be shown in dim Grey (light Grey if not selectable).
Click on the selectable TPs to connect it to the measurement bus.
If there is a valid Test Profile, then the selected TP will be connected to the M'Plus bus, and then the corresponding TP designated within the Test Profile will be automatically connected to the M'Minus bus.
When fully connected, the TPs will coloured in their designated colour (see Definitions and Categories of Test Points) and the Probe lines (red - M'Plus bus and black M'Minus bus) will be drawn to the selected instrument shown on the Secondary Display.
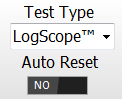
This application will open with the relevant Test Type already selected based on the selection from NODES™, but there is option to change the Test Type.
A list of Test Types will be displayed in the dropdown field based on the instrumentation available.
Options that may be made available are:
LogScope™ - uses the DMM in 2-Wire Ohms mode, see LogScope™ Testing.
Diode - uses the DMM in Volt Diode, see Diode Testing.
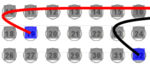
The NODES™ may hold predefined Test Profiles for specific Test Types. For example for LogScope™, there is a predefined Test Profile for each TP in the UUT called Con-Default. However, the User may have added extra Test Profiles for a range of different Test Types. If Use Test Profiles is selected to Yes, then only TP with Test Profiles for the Test Type selected will be shown in dim Grey (TP 39), or a light Grey (TP 40) if there is no Test Profile available, as shown below.
This graphical distinction, allows the User to quickly identify which TPs have defined Test Profiles. Only dim Grey TP are selectable.
When Use Test Profiles is set to No, all TP become available for selection and they are all shown in dim Grey.
In addition, an option to select the Master Probe is shown. Selecting the Master Probe allows the User to designate which of the probes connects first and/or stays fixed.
This shows the Master Probe as M-. This means that if nothing is connected, the first TP selected will connect to the M'Minus bus, and the second TP selected to the M'Plus bus. Subsequent selections, will keep the M'Minus bus fixed and move the TP on the M'Plus bus. This helps to assist quick testing of multiple TPs with a fixed reference.
Flip TPs button - once both TPs have been connected, it may be advantageous to quickly swap the connection around; this is especially so for Diode Testing, SSTDR Testing and Tracker Testing where the connection orientation could make a difference.
If the existing connections are defined by a predefined Test Profile, then it is unlikely that swapping the connections around will have a defined Test Profile of that configuration; therefore, it is likely that the Use Test Profiles options will be automatically set to No.
Reset button - will stop the selected instrument from reading, disconnect all TPs from the IFD™ hardware and bring the GXY to the front ready for the next TP selection.
Test Profile editing will allow the User to edit Test Profiles without having to close the Click&Test™ application and go back to the main NODES™ software. This is due in Spring 2019.
The Capture button will perform a Capture operation as if the Capture button on the instrument's application has been pressed. A Capture will report the last readings to the Click&Test™ application, and this will be displayed on the Grid View with a pass/fail criteria (if relevant), and the data will also be saved to a csv file in the UUT's data folder.
Click Gold to declare the currently readings as the Gold; shown on the instrument's application and also the Secondary Display.
If there is no Gold, then the button will show Profile. Use the Profile button to create a new Test Profile using the current test settings, the TPs connected and the current values as the new Gold.


 This shows the
